


Gitlab从搭建到放弃之玩转CI
text
CentOS-7-x86_64-Minimal-1804(CentOS Linux release 7.8.2003 (Core))
推荐最低配置: 2C 4G disk: 40G
内核优化(vi /etc/sysctl.conf)
text
# kernel optimize
## 表示套接字由本端要求关闭,这个参数决定了它保持在FIN-wAIT-2状态的时间,默认值是60秒,建议调整为2,该参数对应系统路径为:/proc/sys/net/ipv4/tcp_fin_timeout 60
net.ipv4.tcp_fin_timeout = 2
## 表示开启重用,允许TIME-wAIT sockets重新用于新的TCP链接,默认值为0,表示关闭,该参数对应系统路径为:/proc/sys/net/ipv4/tcp_tw_reuse 0
net.ipv4.tcp_tw_reuse = 1
## 表示开启TCP链接中TIME_WAIT sockets的快速回收,该参数对应系统路径为:/proc/sys/net/ipv4/tcp_tw_recycle,默认为0 表示关闭,不建议开启,因为nat网络问题
## reuse和recycle这俩个参数是为防止生产环境下web,squid等业务服务器time_wait网络状态数量过多设置的
net.ipv4.tcp_tw_recycle = 0
## 表示开启SYN Cookies功能,当出现SYN等待队列溢出时,启用Cookies来处理,可防范少量SYN攻击,该参数对应系统路径为:/proc/sys/net/ipv4/tcp_syscookies,默认为1,表示开启
net.ipv4.tcp_syncookies = 1
## 表示当keepalive启用时,TCP发送keepalive消息的频度,默认是2小时,建议更改为10分钟,该参数对应系统路径为:/proc/sys/net/ipv4/tcp_keepalive_time,默认为7200秒
net.ipv4.tcp_keepalive_time =600
## 该选项用来设定允许系统打开的端口范围,即用于向外链接的端口范围,该参数对应系统路径为:/proc/sys/net/ipv4/ip_local_port_range 默认,32768 60999
net.ipv4.ip_local_port_range = 32768   60999
## 表示SYN队列的长度,默认为1024,建议加大队列的长度,为8182或更多,这样可以容纳更多等待链接的网络连接数,该参数为服务器端用于记录那些尚未收到客户端确认信息的链接请求的最大值,该参数对应系统路径为:/proc/sys/net/ipv4/tcp_max_syn_backlog
net.ipv4.tcp_max_syn_backlog = 1024
## 该选项默认值是128,这个参数用于调节系统同时发起的TCP连接数,在高并发的请求中,默认的值可能会导致链接超时或重传,因此,需要结合并发请求数来调节此值,该参数对应系统路径为:/proc/sys/net/ipv4/somaxconn 128,默认没有这个配置,需要自己生成
net.core.somaxconn = 1024
## 表示系统同时保持TIME_WAIT套接字的最大数量,如果超过这个数值,TIME_WAIT套接字将立刻被清除并打印警告信息,默认为5000,对于Aapache,Nginx等服务器来说可以将其调低一点,如改为5000-30000,不用业务的服务器也可以给大一点,比如LVS,Squid,该参数对应系统路径为:/proc/sys/net/ipv4/tcp_max_tw_buckets
net.ipv4.tcp_max_tw_buckets = 5000
## 表示内核放弃建立链接之前发送SYN包的数量,该参数对应系统路径为:/proc/sys/net/ipv4/tcp_syn_retries,默认是6
net.ipv4.tcp_syn_retries = 1
## 参数的值决定了内核放弃链接之前发送SYN+ACK包的数量,该参数对应系统路径为:/proc/sys/net/ipv4/tcp_synack_retries,默认是2
net.ipv4.tcp_synack_retries = 1
## 表示当每个网络接口接收数据包的速率比内核处理这些包的速率快时,允许发送到队列的数据包最大数,该参数对应系统路径为:/proc/sys/net/ipv4/netdev_max_backlog,默认值为1000
net.core.netdev_max_backlog = 1000  # 默认没有这个配置,需要自己生成
## 用于设定系统中最多有多少个TCP套接字不被关联到任何一个用户文件句柄上,如果超过这个数值,孤立链接将立即被复位并打印出警号信息,这个限制只是为了防止简单的DoS攻击,不能过分依靠这个限制甚至人为减小这个值,更多的情况是增加这个值,默认是4096,建议该值修改为2000,该参数对应系统路径为:/proc/sys/net/ipv4/tcp_max_orphans
net.ipv4.tcp_max_orphans = 2000
## 以下参数是对iptables防火墙的优化,防火墙不开会有提示,可以忽略不理。
#net.ipv4.ip_conntrack_max = 25000000
shell
# 使配置文件生效,两次是为了保险
sysctl –p
sysctl –p
系统调校
shell
# selinux disable
setenforce 0
sed -i 's/^SELINUX=enforcing$/SELINUX=disabled/' /etc/selinux/config

# firewall stop
systemctl stop firewalld
systemctl disable firewalld

# max fileSize
vi /etc/rc.local
## open files
ulimit -HSn 65535
## stack size
ulimit -s 65535

# 关闭Swap分区
swapoff -a
cp -p /etc/fstab /etc/fstab.bak$(date '+%Y%m%d%H%M%S')
sed -i "s/\/dev\/mapper\/centos-swap/\#\/dev\/mapper\/centos-swap/g" /etc/fstab
mount -a
free -m
cat /proc/swaps

# 安装常用软件包
yum install gcc patch libffi-devel python-devel zlib-devel bzip2-devel openssl-devel ncurses-devel sqlite-devel readline-devel tk-devel gdbm-devel db4-devel libpcap-devel xz-devel netstat lrzsz unzip zip sysstat ntpdate net-tools vim wget -y

# yumsource alibaba
mv /etc/yum.repos.d/CentOS-Base.repo /etc/yum.repos.d/CentOS-Base.repo_bak
curl http://mirrors.aliyun.com/repo/Centos-7.repo > /etc/yum.repos.d/CentOS-Base.repo
curl http://mirrors.aliyun.com/repo/epel-7.repo > /etc/yum.repos.d/epel.repo
sed -i -e '/mirrors.cloud.aliyuncs.com/d' -e '/mirrors.aliyuncs.com/d' /etc/yum.repos.d/CentOS-Base.repo
sed -i -e '/mirrors.cloud.aliyuncs.com/d' -e '/mirrors.aliyuncs.com/d' /etc/yum.repos.d/epel.repo

# 静态IP地址(VM-NAT),执行命令 vi /etc/sysconfig/network-scripts/ifcfg-ens33,ens33这是我的网卡名称, 你们用你们的, 用ip a查看
BOOTPROTO="static"
DEFROUTE="yes"
IPV4_FAILURE_FATAL="no"
IPV6INIT="no"
ONBOOT="yes"
#以下地址以自己的环境为准
IPADDR=192.168.175.100
NETMASK=255.255.255.0
GATEWAY=192.168.175.2
DNS1=223.5.5.5
DNS2=8.8.8.8

# 别忘记重启网络服务
service network restart
初始化命令
shell
yum install netstat lrzsz unzip zip sysstat ntpdate net-tools vim git -y
yum install epel-release -y
yum makecache fast
yum install ansible -y
安装GitLab
shell
# 清华大学开源软件镜像站 https://mirrors.tuna.tsinghua.edu.cn/gitlab-ce/yum/

# 快速通道
https://www.aliyundrive.com/s/8x7uoG1noxj

# 上传到服务器上,执行以下命令安装
# 12及以上的版本需要policycoreutils-python包的支持, yum install policycoreutils-python -y
rpm -i gitlab-ce-9.5.10-ce.0.el7.x86_64.rpm

# 如果出现Gitlab和狐狸图案,说明安装成功
配置GitLab
shell
vi /etc/gitlab/gitlab.rb
# --------- 默认8080 -----
external_url 'http://192.168.175.100:80'
# -------- wq!保存退出 ----
# 重新配置
gitlab-ctl reconfigure
# 重启
gitlab-ctl restart
# ok: run: gitaly: (pid 12212) 1s
# ok: run: gitlab-monitor: (pid 12225) 0s
# ok: run: gitlab-workhorse: (pid 12228) 1s
# ok: run: logrotate: (pid 12238) 0s
# ok: run: nginx: (pid 12244) 0s
# ok: run: node-exporter: (pid 12291) 1s
# ok: run: postgres-exporter: (pid 12296) 0s
# ok: run: postgresql: (pid 12305) 1s
# ok: run: prometheus: (pid 12313) 0s
# ok: run: redis: (pid 12321) 1s
# ok: run: redis-exporter: (pid 12326) 0s
# ok: run: sidekiq: (pid 12339) 1s
# ok: run: unicorn: (pid 12349) 0s
访问并修改密码
text
http://192.168.175.100

初始账户:root
初始密码我这随意搞一个:p7$DTwc#QTh*sDJ&

修改完之后,直接"Sign in" 进行登陆

然后你会看到加粗黑体 "Welcome to GitLab", 至此, 教程结束? 我是来搞笑的.
Runner的类型
text
共享型(Shared Runner):使用gitlab的root用户下的token注册
特享型(Specific Runner):使用gitlab项目相关人员下的token注册
配置Linux Git-Runner
shell
# 在首页,也就是"http://192.168.175.100"的顶栏右侧靠左, 有一个小扳手, 用鼠标指针戳他.
# 戳完后我们就来到了一个叫"Admin Area"的页面
# 接着在另一台虚机上执行(毕竟同台没试过)
yum install git-1.8.3.1-23.el7_8 -y
# gitlab-ci-multi-runner这个包得先上传, 别啪啪啪的复制粘贴, 到时候说帖子没用
wget https://doc.odboy.cn/upload/gitlab-ci-multi-runner-9.5.1-1.x86_64.rpm
# 上传到服务器上,执行以下命令安装
rpm -i gitlab-ci-multi-runner-9.5.1-1.x86_64.rpm
# 看到 GitLab Runner: creating gitlab-runner... 就安装成功了, 接下来咱们注册Runner
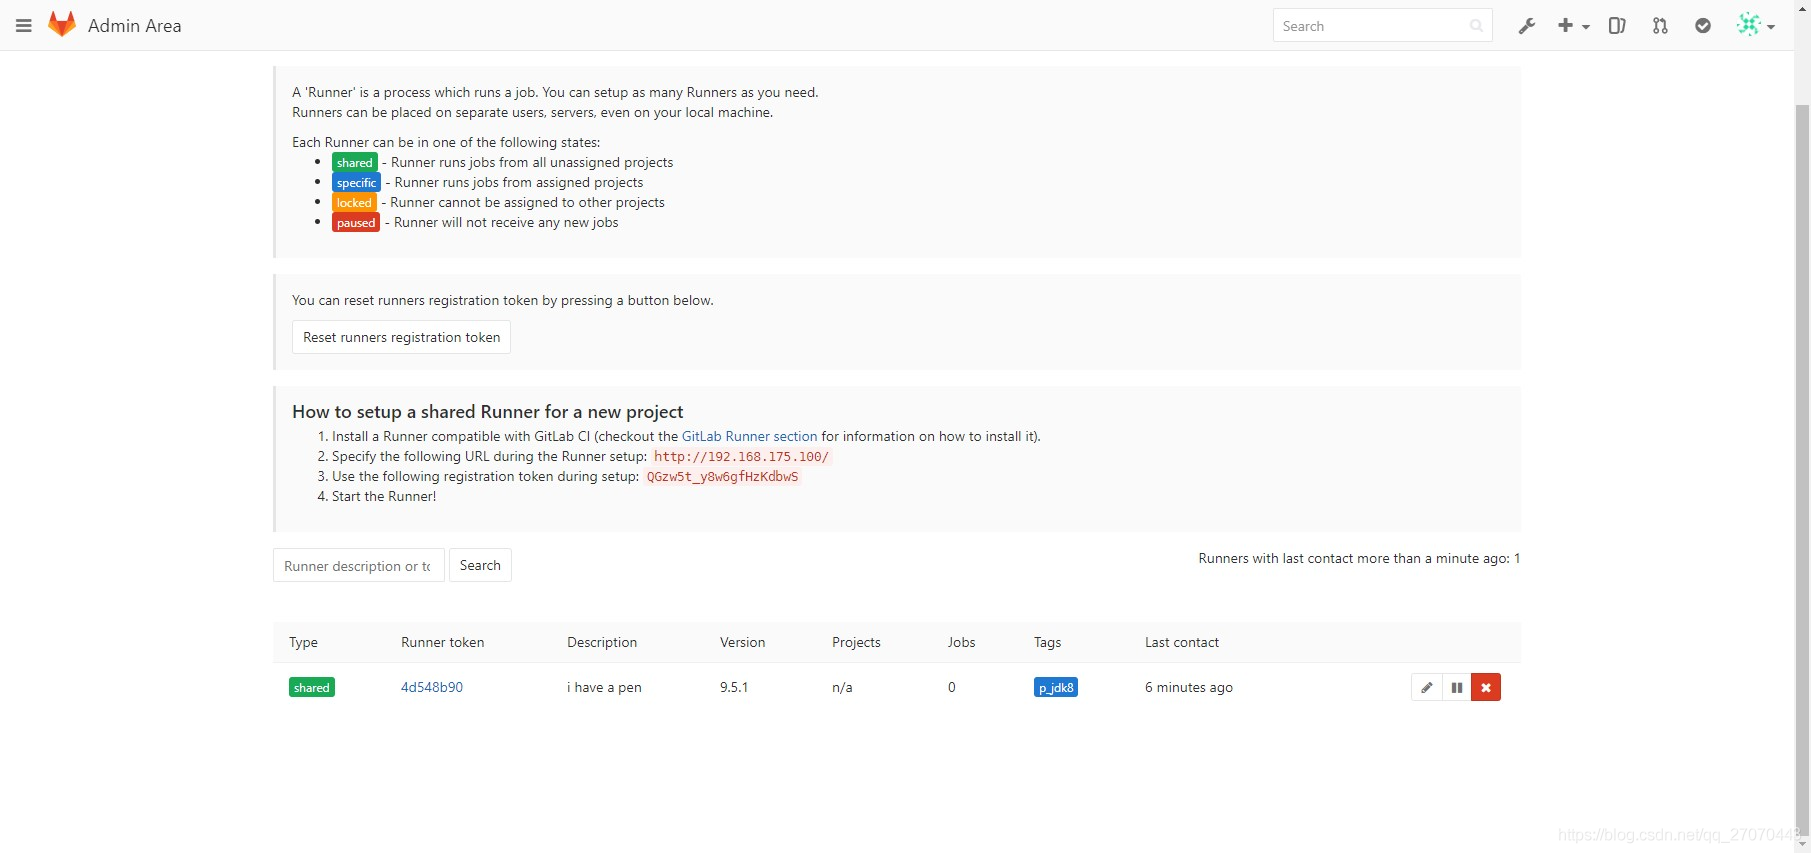
# 向GitLab-CI注册一个Runner需要两东西:GitLab-CI的url和注册token, 对!你可能发现了,就在"Admin Area"这个页面里头, 选项卡切换到Runners, 你就会看到下方的url和token
# 下面是我的url和token
# http://192.168.175.100/
# QGzw5t_y8w6gfHzKdbwS
gitlab-ci-multi-runner register
# Please enter the gitlab-ci coordinator URL:
http://192.168.175.100/
# Please enter the gitlab-ci token for this runner:
QGzw5t_y8w6gfHzKdbwS
# Please enter the gitlab-ci description for this runner:
i have a pen
# Please enter the gitlab-ci tags for this runner (comma separated): 这个比较特殊, 最好别乱取
p_jdk8
# Whether to run untagged builds [true/false]:
false
# Whether to lock Runner to current project [true/false]:
false
# Registering runner... succeeded runner=QGzw5t_y
# Please enter the executor: ssh, docker+machine, docker-ssh+machine, docker-ssh, shell, virtualbox, kubernetes, docker, parallels: 我这是Java项目, 我选shell, 其他的自行研究下
shell
# Runner registered successfully. Feel free to start it, but if it's running already the config should be automatically reloaded!
# gitlab-runner个性化配置(runners配置后追加, builds_url和cache_url)
vim /etc/gitlab-runner/config.toml
# ------ config.toml content start ------
concurrent = 1
check_interval = 0
[[runners]]
name = "i have a pen"
url = "http://192.168.175.100/"
token = "4d548b9065e4b76f560df1a93cbb98"
executor = "shell"
builds_dir = "/app/build"
cache_dir = "/app/cache"
[runners.cache]
# ------ config.toml content end ------
mkdir -p /app/build
mkdir -p /app/cache
chown gitlab-runner. -R /app
exit
# 上面注册完毕, 这步就开始启用它了(最好直接重启, 稳的一批)
gitlab-runner start 运行
gitlab-runner stop 停止
gitlab-runner restart 重启
gitlab-runner list 查看各个Runner的状态
# 然后回到"Admin Area"页面, 刷新看看, Runner是否注册上了
配置Windows Git-Runner
shell
# https://docs.gitlab.com/runner/install/windows.html

# 快速通道
https://www.aliyundrive.com/s/8x7uoG1noxj

# 依然是先安装git, git包已给出, 一路next然后install即可, 然后在某个盘建个文件夹, tools

# 两种运行方式:
# 运行服务使用内置的系统帐户
cd C:\tools
.\gitlab-runner-windows-amd64.exe install
.\gitlab-runner-windows-amd64.exe start
# 使用用户帐户运行服务
cd C:\tools
.\gitlab-runner-windows-amd64.exe install --user odboy --password 23333
.\gitlab-runner-windows-amd64.exe start
# (可选)更新运行程序concurrent值,C:\tools\config.toml 以允许多个并发作业
#  concurrent  限制全局可以同时运行的作业数。使用所有已定义的运行器的作业的最大上限。0 并不意味着无限
# (后期)更新
cd C:\tools
.\gitlab-runner-windows-amd64.exe stop (替换后, 重启)
.\gitlab-runner-windows-amd64.exe start
# (后期)卸载
cd C:\tools
.\gitlab-runner-windows-amd64.exe stop
.\gitlab-runner-windows-amd64.exe uninstall
cd ..
rmdir /s tools

# 哦, 差点忘记了, 要注册, 步骤我就不重复了, 和Linux极其类似, 方式也是选shell
.\gitlab-runner-windows-amd64.exe register
.\gitlab-runner-windows-amd64.exe stop
.\gitlab-runner-windows-amd64.exe start
Gitlab-Runner
机器上所拥有的环境,决定了你能做的事情,正所谓能力越大责任越大

shell
# Linux配置jdk8
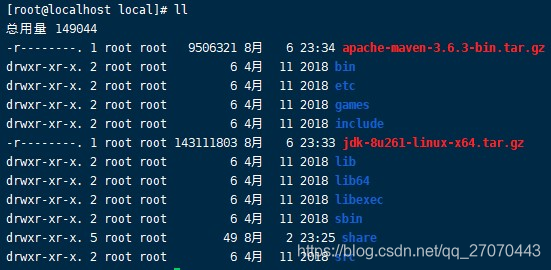
cd / && mkdir app && chown gitlab-runner:gitlab-runner app
cd /usr/local
rz (这里先把jdk和maven的包传上来)
# 解压
tar -xzvf apache-maven-3.6.3-bin.tar.gz
tar -xzvf jdk-8u261-linux-x64.tar.gz
# 配置环境变量脚本
cd /etc/profile.d
vim jdk.sh
# ------ jdk.sh content start ------
export JAVA_HOME=/usr/local/jdk1.8.0_261
export CLASSPATH=.:${JAVA_HOME}/lib/dt.jar:${JAVA_HOME}/lib/tools.jar
export PATH=${JAVA_HOME}/bin:$PATH
# ------ jdk.sh content end ------
vi maven.sh
# ------ maven.sh content start ------
export MAVEN_HOME=/usr/local/apache-maven-3.6.3
export PATH=${MAVEN_HOME}/bin:$PATH
# ------ maven.sh content end ------
# 切换到gitlab-runner用户, 执行
source /etc/profile
# 然后依次执行
java -version
mvn -version
# 倘若显示正确的版本号, 那么说明配置成功
# 配置maven镜像源和本地路径
cd /app && mkdir repository
chown gitlab-runner:gitlab-runner /app/repository
cd /usr/local/apache-maven-3.6.3/conf
vim settings.xml
# ------ settings.xml replace content start ----
<?xml version="1.0" encoding="UTF-8"?>
<settings xmlns="http://maven.apache.org/SETTINGS/1.0.0" xmlns:xsi="http://www.w3.org/2001/XMLSchema-instance" xsi:schemaLocation="http://maven.apache.org/SETTINGS/1.0.0 http://maven.apache.org/xsd/settings-1.0.0.xsd">
<localRepository>/app/repository</localRepository>
<mirrors>
<mirror>
<id>alimaven</id>
<mirrorOf>central</mirrorOf>
<name>aliyun maven</name>
<url>http://maven.aliyun.com/nexus/content/repositories/central/</url>
</mirror>
</mirrors>
</settings>
# ------ settings.xml replace content end ------
# 你以为这就完了吗?继续~Gitlab:新增分组和用户
shell
# 点击顶栏"小扳手",看到'Project: 0  Users: 1   Groups: 0'
# New group
## Group path:
http://192.168.175.100/DevBack
## Group name:
DevBack
## Description
后端开发
## Create group, 然后分组创建完毕了,再次点击顶栏"小扳手",看到'Project: 0  Users: 1   Groups: 1'
# New user
## Name:
odboy
## Username:
odboy
## Email:
tianjun@odboy.cn
## Projects limit:
20
## Access level:
Regular
## Create user, 然后用户创建完毕了,再次点击顶栏"小扳手",看到'Project: 0  Users: 2   Groups: 1'
# 你以为这就完了吗?继续~
Gitlab:新增项目

shell
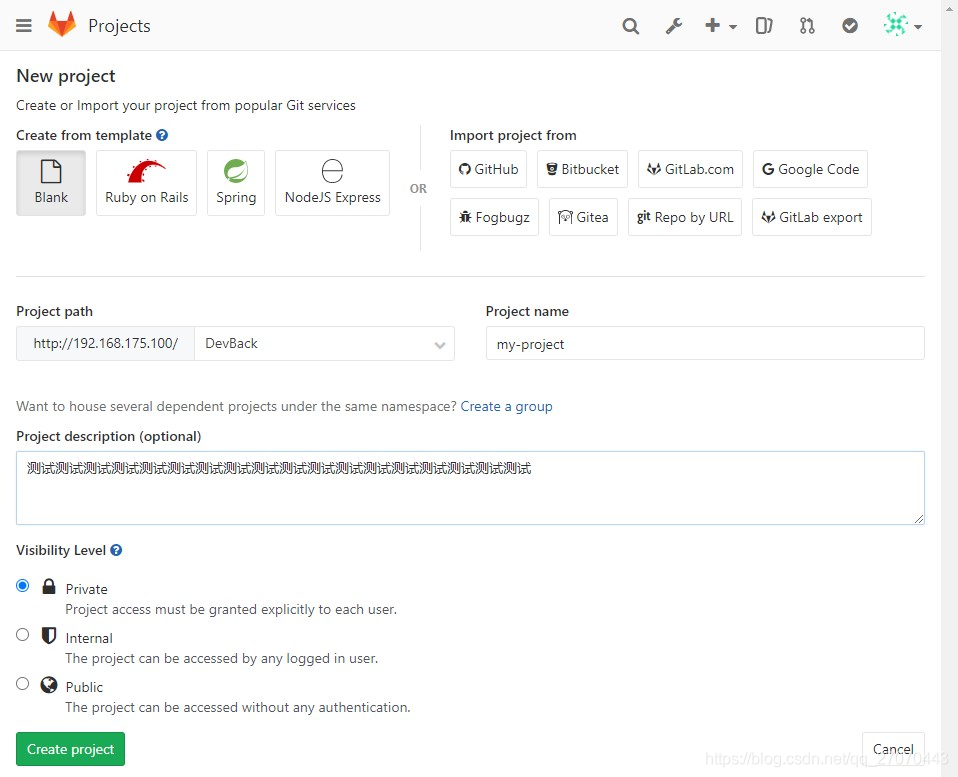
# 点击首页右上角的"+"号
# Project path, 这个地方换个分组, 给权限的时候也好给
# Project name, 嗯, "my-project" 吧
# 然后Visibility Level一定是Private
# Create project
Gitlab:命令行指南(官方)
shell
# Git global setup
git config --global user.name "Administrator"
git config --global user.email "admin@example.com"

# Create a new repository
git clone http://192.168.175.100/DevBack/my-project.git
cd my-project
touch README.md
git add README.md
git commit -m "add README"
git push -u origin master

# Existing folder
cd existing_folder
git init
git remote add origin http://192.168.175.100/DevBack/my-project.git
git add .
git commit -m "Initial commit"
git push -u origin master

# Existing Git repository
cd existing_repo
git remote add origin http://192.168.175.100/DevBack/my-project.git
git push -u origin --all
git push -u origin --tags
Gitlab:".gitlab-ci.yml"预设环境变量
text
$CI_PROJECT_NAME		项目名称
$CI_PROJECT_NAMESPACE		组名称
$CI_PROJECT_PATH		项目相对路径
$CI_PROJECT_URL			项目URL地址
$GITLAB_USER_NAME		用户名称
$GITLAB_USER_EMAIL		用户邮箱
$CI_PROJECT_DIR			项目绝对路径
$CI_PIPELINE_ID			流水线ID
$CI_COMMIT_REF_NAME		当前分支
Gitlab:".gitlab-ci.yml" Demo
text
variables:
  MAVEN_CLI_OPTS: "-Dfile.encoding=UTF-8 -s /usr/local/apache-maven-3.6.3/conf/settings.xml"

stages:
  - build

buildJob:
  stage: build
  variables:
    projectid: $CI_PROJECT_ID
    projectname: $CI_PROJECT_NAME
    jobid: $CI_JOB_ID
    pipelineid: $CI_PIPELINE_ID
    commitid: $CI_COMMIT_SHA
    envlabel: "build"
  script:
    - mvn -U clean package -Dmaven.test.skip=true
    - echo $projectname"_"$(date +%Y%m%d%H%M)
    - echo $projectid
    - echo $pipelineid
    - echo $jobid
    - echo $commitid
    - echo $envlabel
    - echo ${PWD}
  tags:
    - p_jdk8
  only:
    - master
yaml执行结果
shell
$ echo $projectname"_"$(date +%Y%m%d%H%M)
my-project_202008070513
$ echo $projectid
1
$ echo $pipelineid
9
$ echo $jobid
17
$ echo $commitid
b60b398d98f479e2507b10558975c98722965278
$ echo $envlabel
build
$ echo ${PWD}
/app/build/4d548b90/0/DevBack/my-project

Job succeeded
Gitlab:CI配置文件说明
text
variables: 全局变量
stages:关键字,可选,用于自定义任务流程。若缺失,默认流程为:build > test > deploy
buildJob:任务名称,可自由定义,可包含空格
stage:关键字,用于指定任务在什么stage运行
variables: 作业级别定义作业变量
script:关键字,按顺序写该任务的shell脚本
only:关键字,用于指定依赖的代码分支, master/release/api(仅api保留字是当PipelineAPI被调用时) 触发
when               关键字, 可选,用于指定任务触发的条件。若缺失,一旦有代码提交到该分支就会自动运行。可设置为手动触发
  on_success       只有当前一个阶段的所有工作都成功时(或者因为它们被标记而被认为是成功的allow_failure)才执行工作 。这是默认值。
  on_failure       仅当前一阶段的至少一个作业失败时才执行作业。
  always           无论先前阶段的工作状态如何,都可以执行工作。
  manual           手动执行作业
  delayed          延迟作业。后面跟start_in,start_in
30minutes(延迟30分钟),不加单位,默认为秒。最长可延迟1小时。
官方文档
text
https://docs.gitlab.com/ce/api/pipelines.html
https://docs.gitlab.com/ce/api/project_level_variables.html
https://docs.gitlab.com/ce/api/group_level_variables.html